Xcode 15 allows you to preview your iOS app's user interface as you build it. Here's how to use it to see how your app appears to users.
Xcode 15 introduced UI Previews which allow you to view what your user interface will look like as you build it in SwiftUI.
In particular Xcode added the #Preview macro that allows you to define how previews will appear for any view or view you add to your SwiftUI app.
In Swift and in C-based languages, a macro is a compiler directive that tells the compiler something special is coming and to treat code defined in the macro as a special case at compile time.
When you compile your code the compiler translates any macros it finds into code based on what's inside the macro. Macros allow you to define a block of code once, and then reuse it multiple times in an app.
SwiftUI allows you to define your app using text, and text definitions of views, as opposed to AppKit's older Interface Builder visual views. By using SwiftUI and previews you can type your code into the Xcode editor pane on the left, and see its preview in the Xcode simulator on the right.
As you type and change your SwiftUI code, the UI preview changes in real time to show you your view.
This has the big advantage of allowing you to see what your app will look like without having to run the compile/build/run cycle each time you make a code change.
Typically in SwiftUI, you can define the ContentView of a View using a Swift struct. For example:
struct ContentView: View {
var body: some View {
Below that, by default you can define #Preview macro as simply returning the ContentView, which Xcode will use to display the view in its preview pane:
#Preview {
ContentView()
This is the default #Preview macro you should supply for your view to appear in the preview pane in Xcode. You can also add more code to your #Preview macro for each view to further customize how Xcode will display your view.
When you compile your code, the Swift compiler actually expands the #Preview macro to the Swift statement "Preview(_:body:)" which takes an optional name, and a ViewBuilder as parameters.
A ViewBuilder is defined by the Swift @ViewBuilder keyword, which indicates to Swift what follows are some UI elements to display.
If you want to define several #Preview macros in the same source file, you can pass in a name as a Swift String to differentiate each:
#Preview("Input true") {
ContentView(someInput: true)
The SwiftUI documentation also has a page which explains the #Preview macro and also talks about how to use a ViewBuilder along with it.
In general, you should define one #Preview macro for each custom view you define in a SwiftUI source file.
If you don't use a #Preview macro for each custom view you create then you'll need to provide a Preview Provider protocol for each view - which is a slightly more involved process and requires a bit more code.
We covered Preview Providers in a previous article which we mention below so we don't cover them again here.
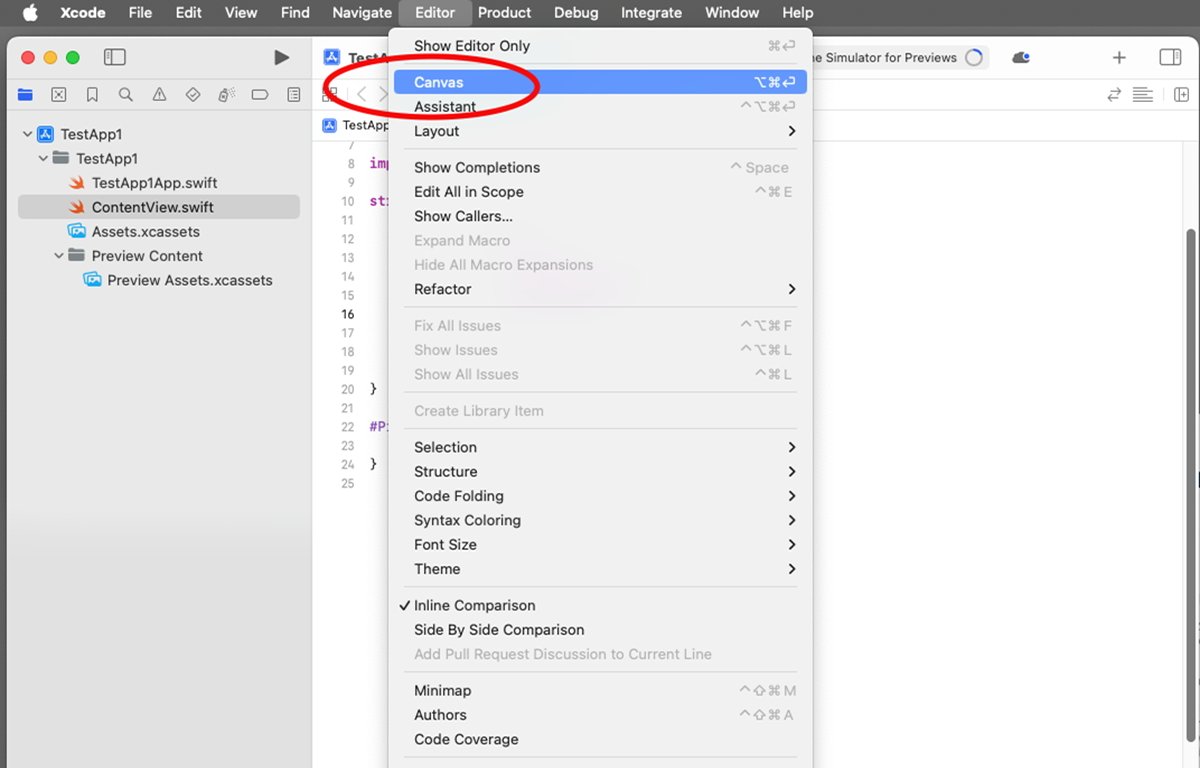
Once you have your #Preview macros defined in your code for each of your views, you can display the Xcode preview canvas by selecting Editor->Canvas from the main Xcode menu bar.
In general, in Swift, a view in an app is defined by the Swift class View, which is synonymous with a UIView in Objective-C or an NSView for macOS apps in Objective-C.
Each Swift View can contain one or more subviews in its ContentView. The ContentView is the view that gets displayed onscreen when your app runs.
Actually, in Swift, a View is defined as both a struct and a protocol on a structure, not as a class. In Swift, structs are more flexible than classes but can be made to behave like classes while adding additional data and behaviors more easily.
A protocol is a set of methods or properties defined for a structure or class that you must implement.
To provide a custom view in Swift, you declare a type that conforms to the View protocol, and implements the required body computed property to provide the content of your view.
For example:
struct MyView: View {
var body: some View {
Text("Hello, World!")
In this example we define a custom struct named MyView which inherits from the Apple class View, and which conforms to the View protocol by defining the computed property body (also as a View) which has a single Text subview with the text "Hello, World!" in it.
When this struct runs, a single Text view is displayed with the text "Hello, World!" In the user interface.
Apple provides various predefined views (such as Text), which you can use in your view's body to create your UI.
In the Xcode Preview canvas, when you change any of the code in the MyView struct, the canvas updates the view in real-time to show you your changes.
The upshot of using Xcode previews is you can see your UI in Xcode as you type - without having to build and run your app. This saves huge amounts of time during development.
SwiftUI and Previews make development easier and lighter - and greatly reduce the number of steps needed to assemble a UI in code.
For a complete discussion of how views work in Xcode, see Apple's SwiftUI documentation section View fundamentals.
Documentation and resources
Apple has a twenty-seven-minute video from WWDC '23 called "Build programmatic UI with Xcode Previews" which summarizes how to use Xcode Previews to see your UI as you build it.
Apple has a complete guide in the Xcode docs on how to preview your UI as you develop it in Xcode titled "Previewing your app's interface in Xcode."
Also, see our previous article "How to use Xcode Previews to see how your app appears as you make it."
"interface" - Google News
March 04, 2024 at 06:24AM
https://ift.tt/r2wgZEk
How to create programmatic UI using Xcode Previews - AppleInsider
"interface" - Google News
https://ift.tt/phBIJNG
https://ift.tt/XcyPbfH
Bagikan Berita Ini


0 Response to "How to create programmatic UI using Xcode Previews - AppleInsider"
Post a Comment